
Splints Stop the Bone From Moving
A splint does one thing.
It immobilizes (keeps still) a suspected fracture — a broken or cracked bone — so that movement does not cause additional damage to the surrounding tissue, nerves, and blood vessels while you get the person to medical care.
This does not mean that you are setting the bone in place.
Nor are you diagnosing anything.
This is done simply to buy time safely.
That is the entire job of an improvised splint, and it is a job anyone can do with whatever is around them.
In the Philippines, accidents happen. On the road, in construction sites, heck, even a sporting injury happens regularly here. Yeah, only in da pilipins.
And guess what… because of the current state of our healthcare system, hospitals are either too far or ill-equipped to handle certain cases.
Well maybe not mending bones that are simple to mend but for most… I’m getting ahead of myself…
Anyway… knowing how to properly apply a splint is very useful.
The opposite, wrongly done, can be very harmful.
When to Splint
| Splint When You See… | Do NOT Splint — Go Straight to ER |
| Deformity, swelling, or bruising at the injury site | Bone is visibly protruding through the skin — cover with clean cloth, do not push it back |
| Person cannot bear weight or move the limb without pain | Suspected spinal, neck, or pelvic injury — do not move the person |
| You are far from a hospital and transport is required | Loss of feeling, severe numbness, or limb turning pale or blue — nerve or vascular emergency |
How to Improvise a Splint: Step by Step
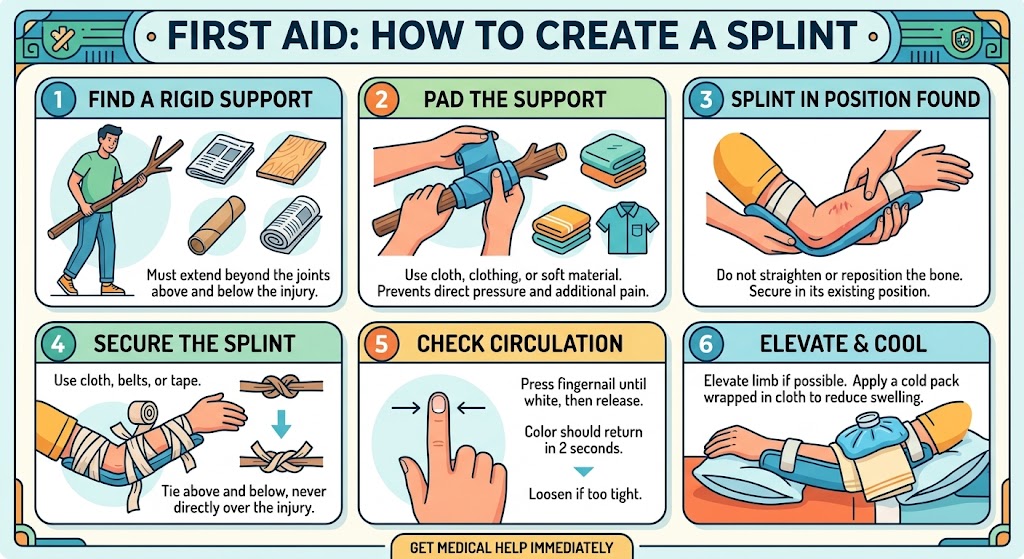
- Find a rigid support — a straight branch, a folded magazine, a piece of plywood, a cardboard tube, or even a tightly rolled newspaper; it must extend beyond the joints above and below the injury
- Pad the support before applying — wrap it in cloth, clothing, or any soft material so it does not press directly against the skin; pressure points cause additional pain and injury
- Place the padded support alongside the injured limb without straightening or repositioning the bone — splint it in the position you find it, not the position you think it should be in
- Secure with strips of cloth, belts, or torn clothing — tie above and below the injury site, never directly over it; tight enough to hold, loose enough to slip a finger underneath
- Check circulation after securing — press a fingernail on the hand or foot of the injured limb until it goes white, then release; color should return within two seconds; if it does not, the splint is too tight, loosen it immediately
- Elevate the limb if possible and apply a cold pack wrapped in cloth to reduce swelling while transporting to the nearest hospital
Note: An improvised splint is a bridge, not a treatment.
The moment you have stabilized the injury, get the person to SPMC, Davao Doctors, or the nearest emergency room, like DLBPCDI, without delay.
Fractures that look manageable can involve vascular (blood vessel) or nerve damage that is not visible from the outside.
Do not let a good improvised splint become a reason to postpone proper medical care.
Splint it, secure it, and go.
